Recently I made a cream Lowrider cardigan and worked an alternative front edge using Granny stitch. I wanted a summery festival look to my cardigan, so I opted for a light neutral base colour, and then some really bright pops of colour for the granny squares and the trim. I always find that once I've made a project once, I look for ways to hack it or change it, just to make things a bit more interesting the second time around. On this cardigan I got the idea to do a granny stitch trim from a cardigan I saw on a high street retailers website. It looked really cool and I figured it would save doing all those rows of rib, which lets face it, are tedious!

Before I get into the edging instructions, I just want to tell you about the Granny squares. I used a different style of Granny square for this cardigan, which starts with a circular centre and has 6 groups across each edge, instead of 5. Because of this, I had to hack the pattern slightly.


I usually make the medium size, which has 51 granny stitch groups, then decreases to 50 groups on the final row, to fit 10 Granny squares, each 5 groups wide. For this cardigan, I made 9 Granny squares, each 6 groups wide, and therefore needed my final row to have 54 Granny stitch groups, to fit the 9 squares. It was the closest match. (It was either that or have 8 Granny squares which would give me 48 groups, so I'd need to decrease by 3 groups, but I chose to go bigger). So I needed to add 3 increases to make 54 groups. I added two at the front (near the armpit - see pic below) and one at the centre back. You can learn how to increase and decrease in Granny stitch here.

I'll be honest and say that I am not really happy with the fit, maybe because those 3 extra groups means it looks a bit more oversized on me now, or it could be because the granny squares, despite vigorous blocking, still don't lie flat. This is entirely my fault. Firstly I should probably have gone down another half hook size as they are a bit big, But it was too late by the time I realised.

Secondly, I have always been an advocator of mixing yarns and yarn brands in your work, but I think I pushed the boundaries too far here. I used several different brands of double knit yarn, but they varied a lot in thickness. I knew this when I was doing it, but I really loved the colour combo (like obsessively) and I wanted it to work. I thought by going up or down a hook size I could compensate for the difference in weight, but all this did, is result in some really dense rows and some really light, loose rows and a Granny square with a saggy centre. You live and you learn. Ever positive, I blocked it by soaking it and pinning it out, but when I soaked it the yellow yarn ran onto the cream in various places and now its basically ruined. Insert crying emoji.

At this point I am just plucking up the courage to try some Vanish on it, or worse, unravel it and start again with the original pattern and Granny squares. The point of writing all of the above really, was to explain why I haven't posted any final pics of me wearing it. But I will be sure to update this post when its fixed!
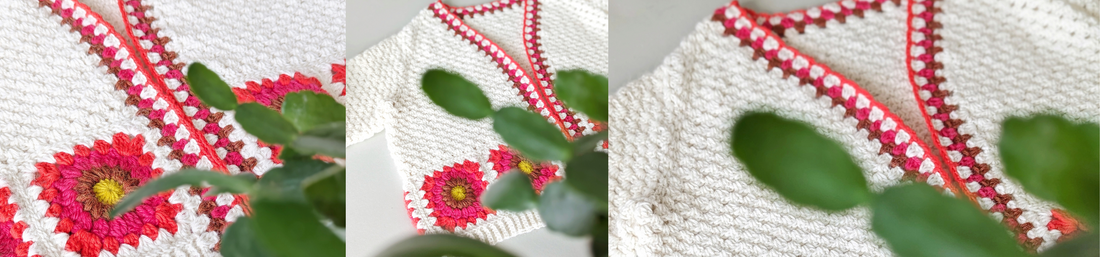
Ok so on to the front edging, an area of the cardigan that I AM really pleased with!

How to work the Granny stitch front edging:
Written in UK crochet terms.
Set up row: First of all I used the main colour, which was the cream yarn, to slip stitch around the whole of the front edge, with the right side of the cardigan facing me. Yes, I know this is tedious, but my front edges were a bit frilly (see the pics further back up this post), and this neatens them up. I also feel that slip stitching prevents the front edges front stretching and sagging. I worked 3 slip stitches per 3 rows up the fronts, and one slip stitch in each stitch round the back neck as per the pattern (shown below) and then fastened off.

Row 1: Then I used the brown yarn to work a row of granny stitch around the front edge. With right side facing, I attached my yarn into the first stitch of the hem rib, worked 3ch to count as the first tr, and then skipped a stitch, worked a 3tr group (working over the first rib row), skipped 2 sts, worked another 3tr group over the first row, then worked a 3tr group in the corner space of the granny square, and in each space along the granny square (shown below).

When I reached the main body I worked a 3tr group every 2 rows. I worked over the slip stitches and into the space between the 1tr and the 3tr group at the end of reach alternate row. See below.

When I reached the back neck I set myself up some decreases for the next row. I worked a 2tr group in the stitch directly above the 2tr raglan groups on the main cardigan. I did this on both back raglan corners - see below.

At the end I worked along the granny square and the rib as before and then ended on a 1tr in the last stitch of the ribbed hem and fastened off.
Row 2: With right side still facing, I attached the pink yarn into the top of the 3ch and worked 3ch, 1tr. I then worked 3tr in each space up the front edge. When I reached the back neck I worked the decreases at each back corner as follows:
Miss the space before the 2tr group, work a 2tr group in the space in the centre of the 2tr group, miss the space after the 2tr group. See below.

Then I continued as normal down the opposite front edge and ended on a 2tr group in the top of the last tr, and fastened off.
Row 3: Next I used the cream yarn to work another row of granny stitch around the front edge. With right side facing, I attached the yarn into the top of the 3ch and worked 3ch and then 3tr in each space up the front edge to the back neck.
At the back neck corners I worked 3tr in the space in the centre of each of the 2tr groups. See below (sorry this pic also has the red row added, but you get the idea).

Then I worked 3tr groups in each space to the end and ended in a 1tr in the top of the last tr and fastened off.
Optional: At this point I reattached the cream yarn to the start of the row with the right side facing and slip stitched once again, around the whole front edge. I felt my edging needed tightening and neatening just a little bit more, but this is entirely up to you.
Final row: With the right side still facing, I attached my red yarn to the space between the 3ch and the first 3tr group and worked a dc. I then worked 3ch, and a dc in the space between 3tr groups. I continued this all round the front edge, with no decreasing at the back neck or anything (see above). I ended on a dc in the space after the last 3tr group before the last 1tr and fastened off.

Sleeve details:
Not to be outshone by the front edging, the sleeves got a little glow up too...

I worked the last 2 rounds before the final decrease round in brown and pink. Because the pink yarn was such a thick double knit, I actually had to alternate between 2tr and 3tr groups, instead of 3tr all the way round. But usually I would just follow the pattern! Then I worked the final decrease round following the pattern in cream. I didn't fasten off, but secured the end of my yarn by passing the ball through the loop and left it attached to work the rib later.
Next, with right side facing, I attached the yellow yarn to the first st of the round and slip stitched in each tr st all the way around and fastened off at the end. When I came to work the rib I ignored the slip stitches and anchored my rib to the top of the cream stitches behind it.
And there you have it.. an alternative edging for a granny stitch cardigan. You could even use it on a Granny Go Round cardigan! If you have a question please do comment below. I would love to see some of you use this technique as I really do love it. Please tag me on Insta if you do so I can see!
The yarns I used were:
Main colour - Viking Alpaca Storm DK - 502
Brown - Viking Alpaca Storm DK - 552
Pink - Cygnet Pure Wool Superwash DK - Raspberry
Yellow - Sirdar Country Classic DK - Chartreuse
Red - Rico Baby Classic DK - Coral