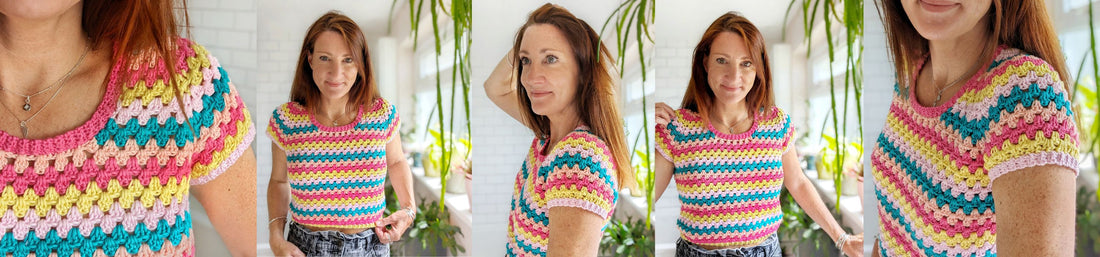
A few weeks back I received some gorgeous yarn from the lovely people at Hoooked. They sent me some of their Eucalyps yarn, which comes in 100g skeins. The shades were Dalia, Giada, Solare, Pastello & Magenta. This yarn is super soft and made from Eucalyptus trees, which I thought was very cool.


So what modifications did I make? (US terms in brackets).
To start with, I'm between a S and M, with a 90cm bust. So I always have the choice whether to size up or down. I'd advise making your regular size unless you want a much more fitted look. I made the S in the jumpers, with a 4mm hook, but since this yarn is a thinner DK, I went down to a 3.5mm hook and started the M, as I was worried the S might be too tight. In the end I made a hybrid of the S and M sizes, due to issues I encountered with my stripes.
When I got to the neckline join, I found myself working my fdc (fsc) sts across the front of the neck in one colour, and starting Joined yoke row 1 in another colour. This didn't look right, as the change in colour meant I had a line of fdc (fsc) sts at the base of my neckline that really stood out. One piece of advice I would give, is if you are working in stripes, work out how many rows until your neck join, and ensure that you plan your colours so that the last row before you join the neck, and joined yoke row 1 are the same colour!

So I ripped back a row and joined the neck at row 17, which is where the S size joins. This worked out fine, but was a lesson in forward planning for me. I carried on and when I reach Joined yoke round 3 - where S and M join their underarms, I had the same problem. I realised that if I ended here, I would have the underarm fdc (fsc) sts in a different colour to the groups in the first body round. So I added an extra yoke round.
To compensate for adding an extra round, I worked only 6 fdc (fsc) sts across the underarms and added only 2 groups, as you do for the S size.
The good thing is that because you're not making sleeves, you don't have to worry about sticking to the stitch count at this point, you can play around and add/remove rows and groups as you see fit, by trying it on throughout the process.

It fitted great and I worked in the round for 5 rows until I was past my bust and then I tried it on again. At this point I felt that it needed some decreases at the sides, to give it a more tapered, less boxy look.
You can find instructions on how to work my method of granny stitch decreases here.

A granny stitch decrease.
Granny stitch decreases are worked over 2 rounds, so I worked them over body rounds 6 and 7. Which meant I now had 2 less groups. My finger shows the first decrease. Its lined up with the centre of the underarm.

Normally you would work an odd number of rounds (3, 5, or 7) before starting your next decrease, so that you can line them all up directly underneath each other. However, this presented me with another set of colour challenges. You really want the 2 decrease rounds to be worked in the same colour, to camouflage them. However, leaving an odd number of rounds between sets, meant that I would be working decrease R1 in one colour and decrease R2 in another. So instead I left 4 rounds in between and didn't worry about lining up my decreases under the arm. I moved them one space to towards the front. Then on the next set, I moved them on space to the back. (My 3 fingers are pointing to the decreases - note how they are not lined up). Since they are camouflaged within the stripes, you don't notice this at all when its being worn.

In the end I worked 4 sets of decreases, all with 4 rounds in between them. I probably didn't need the last set, as its quite narrow towards the hem and hard to get over my shoulders, but it looks nice on! If only crochet had the elasticity of knitting!
When it came to the sleeve I worked round 1 only. I did this because my yoke had ended on a single yellow row, and I wanted to finish off the stripe. But I would advise adding this round anyway, because it makes the rib easier to work.


When it came to the rib I worked the neck in exactly the same way, with the slip stitches. These are important as they give a clean finish if your rib is a different colour to your yoke (e.g. if you're working in stripes). Then I worked the rib with 3 sts instead of 6, to make it narrower than on the jumper.


So it would read like this: (exchange dc for sc if working in US terms).
R1: 4ch, 1dc in second ch from hook (1 missed ch does not count as stitch), 1dc in next 2ch to end. Sl st blo across top of first 2 sts around main body to anchor rib, turn. 3sts.
R2: Miss sl sts. 1dc blo in each st to end, turn.
R3: 1ch, 1dc blo in next 3sts to end. Sl st blo across top of next 2 sts along edge, turn.
Repeat R2 & R3 around hem to end.
My top weighs 462g (16 ¼ oz), so only slightly less than the tapered sleeve Lowrider jumper - 1.7% less infact! So that's pretty much it.. if you have any questions do leave them below and if you try this out, please tag me on Instagram and use the hashtag #Lowridertee as I'd love to see! x
In summary:
- Use a lightweight summery yarn, such as Cotton, Linen, Bamboo or Eucalyptus
- Stick to your normal size, unless you want a much more fitted look.
- Try it on as you go and make adjustments as you see fit.
- Work decreases down the sides - again, try on as you go.
- Work 3 sts for the rib instead of 6.
- Only work round 1 of the sleeve.
- Add rib to the sleeve using the same method as the hem.


2 comments
Boa tarde. Você teria o gráfico da blusa? Gostaria de fazer
Hi, do you have a pattern? Is thus too difficult? Would you recommend that i start with a simpler pattern?